Monday, June 8, 2009

Someone Should Go Work Here


Check out the job listings for Bethesda. Makers of Fallout 3 n' Oblivion. Hone thy skills.

Tuesday, June 2, 2009

Trisha and Casey Animation!

Trisha Johansen and Casey Pyke's computer animated short, Alley Dog premiers this Wednesday night, June 3, at 7:00 p.m. in the Meese Auditorium of the SOU Arts Building. Be there.

Thursday, May 28, 2009

FINAL CRIT

3D-Style!
Tuesday, June 9 3:30!
Exclamation!

Sunday, May 10, 2009

Nice UV Editor and Maya Tutorials


Sweetly succulent-looking UV Mapping Program! This looks tear-jerkingly better than traditional UV mapping techniques.
Check out the demo videos here

Also, really good-looking Maya tutorials from Digital Tutors--as recommended by your friendly TA, Lucas Schmidt! I would highly recommend these for anyone who wants to get serious about this 3D thing. These would be great to do over the summer.

Thursday, April 30, 2009

Tuesday, April 21, 2009

Lt Dan -- Setting Up A Character Set--

A character set sets keys for all objects and attributes assigned to the character set whenever you set a key for any one of those objects or attributes. Sometimes that's great, other times it's not so great. Character sets can be turned on and off accordingly. For the initial pass through my first Lt. Dan animation, a character set will allow me to not have to worry about manually setting position and rotation keys for the plant foot. That is good.

Here's how to make a Character Set.

1. Select the objects you want to be in the character set. I'm going to choose the outer "Ring of Saturn" (ball_CTRL) and the two foot control boxes. Use the shift key to select multiple objects.

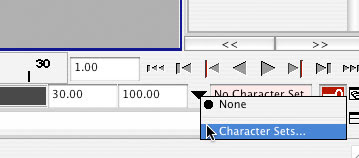
2. Click and hold the black arrow next to the pink box that says "No Character Set" at the bottom right of the screen. Choose "Character Set Editor. . ." from the pop-up. The pic below is from an earlier version o' Maya, so, deal with it.


3. The "Relationship Editor" opens. From the Relationship Editor menu choose Edit > Create Character Set > Lil' Options Box.


4. From the options dialog, give your set a name and choose the attributes you want to be keyed by the set. I choose All Keyable Except: Scale, Visibility, and Dynamic.

5. Your new Character Set appears in the left hand part of the Relationship Editor.

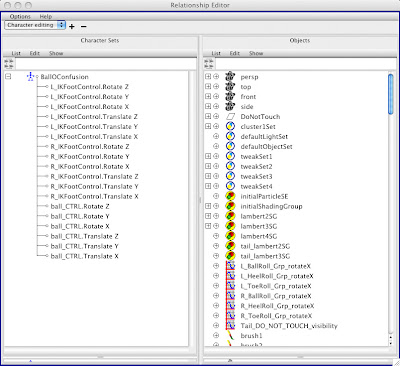
6. You can add and delete attributes for the character set using the Edit menu in the Relationship Editor. MAKE SURE THAT YOU HAVE THE CHARACTER SET SELECTED IF YOU WISH TO EDIT IT! It's easy to miss that. If you do miss it, you will be driven crazy. I recommend adding the Roll attribute from each of the feet. Select the feet, go back to the character set editor and click Edit>Add Objects To Character Set. Highlight any attributes you don't want and click Edit > Remove Highlighted Attributes.

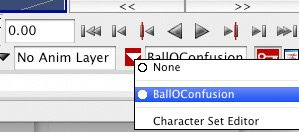
7. Now select the new character set from the black arrow at the bottom right of the screen (where you first opened the relationship editor). The name of your character set should now be showing in the little pink box next to the arrow. Whenever you want to turn it off, select "None" from the black arrow flyout menu.


8. Save this file under a new name so you don't have to go through these same steps every time you work on this character. Name it "LDanCharSet." Set this file to read-only so you can always start an animation with a fresh copy of your rig.

9. I'll say it once and I'll say it again. . . once you start animating a shot, save MULTIPLE VERSIONS of the shot as it develops. i.e. "LtDanWalk01", "LtDanWalk02" etc. Any time you've accomplished any "work" save a version. These rigs will occasionally freak out and self-destruct. Undo will not help you. Your only recourse is to go back to an early version of your animation. If you don't have an earlier version, you're screwed.

Thursday, April 2, 2009

Sqaush Stretch Ball Demo

Click here to download the demo movie of the squash and stretch ball.
And here's the maya file, if you desire.

Live These Tutorials

Two excellent tutorials on spline editing from Spline Doctors!
Part 1. This is a demo of how various effects can be achieved through spline editing.
Part 2. This has good stuff on what NOT to do in the spline editor--as well as an advanced character animation demo.

Wednesday, April 1, 2009

Ashland Independent Film Festival starts THURSDAY!


Ashland Independent Film Festival student tickets are only $6 per screening--so GO. A unique opportunity to see things you likely won't see anywhere else. April 2-6. This is perfect material for you to write about in your blogs. Anyone even vaguely interested in film/video should go and check this out.

Tuesday, March 31, 2009

Give Me Your Blogs, People

Post your name and your URL as a comment on this post.
Merci,
Mille

Interpretive Dance via the Maya Timeline

1. Turn Auto Keying on and off. Click the little key icon to the right of the timeline. Red is on, black is off.

2. Move a Key. Shift + Left Click on a key. Let go. Click and drag on the inner set of arrows to move it to its new location. When you're done, click somewhere else in the timeline to cancel out of the move/scale mode. Be careful not to click the outer set of arrows. Those will scale yer keys. That's bad (for now).

3. Copy a Key. Right Click on a key and choose Copy from the fly-out menu.

4. Paste a Key. After copying a key, right click the frame into which you'd like to paste your copied keyframe. Choose Paste > Paste from the fly-out menu. Beware not to just click paste and let go. There are two pastes you have to choose. It's Maya, remember.

5. Change Playback Range. Enter new numbers in the inner set of boxes 'neath the timeline.

6. Change overall animation length. Enter new numbers in the outer set of boxes 'neath the timeline.

Getting Set Up in Maya


Maya's got a funny way of showing that it loves you. Here are the steps you need to take to get it to behave correctly. You should only have to do this once. (Until you have to trash your pref's, then you'll be doing it again. Ah ha ha ha. Ha. ha. ugh.)

1. Set default frame rate and initial animation length. From the menu bar, choose File > New Scene > Options Box. Set to NTSC 30 fps. You'd think this would be under preferences, and it is! It just doesn't act as a default there. Good lord.

2. Create a new Scene. Hit the New button at the bottom of the Options dialogue.

3. Set playback to Real Time (30 fps). Under Maya > Preferences > Settings > Timeline > Playback. Also, go ahead and set Looping to continuous.

4. Set Default in and out tangents to Linear. This is under Maya > Preferences > Settings > Animation. Go ahead and check the Weighted Tangents box here as well. Ha ha, notice there are two categories of "Animation" in the preferences panel. Make sure you're on the right one. Brilliant.

5. Create a new project. File > Project > New.

6. Set up the new project. In the New Project dialogue that pops up do the following:
a) Enter a Name for your project.
b) Hit the "Browse" button next to location and choose a place on your account that makes sense to you. Pay attention when you are doing this; if you don't know where your project is, y'all's in trouble. YOU DO NOT HAVE TO CREATE A NEW FOLDER. Maya will automatically put everything into a new folder with your project name on it.
c) Hit the Use Defaults button at the bottom of the dialogue box.
d) Hit the Accept button at the bottom of the dialogue box
e) If you want to switch between projects later, go to File > Project > Set

Tuesday, March 10, 2009

Final Frontier

Le 3D final critique will be Tuesday, March 17 at 6:30 p.m. in Le Lab Digital. C'est magnifique.

Thursday, February 12, 2009

Nifty Bit of Bloggery


Here's a cool Blogue from Graham Annable (that's his "Kodiak Mary" image above). He's a story artist, animator, and "comic fellow" who works for Laika up in Portland and recently worked on Coraline. Most importantly, he's a hockey teammate of SOU's own Jill Bruhn. Some very nice stuff; this guy's good. Check it out and get inspired.

Tuesday, February 10, 2009

Quick Maya Material Reference


Here's a good reference for the Hypershade. It gives short, clear descriptions of shader types and attributes in 3 handy pages.

Here are some guidelines when working with materials:
1. If you're using texture files, start off with a Blinn.
2. Most materials will involve Color, Bump, and Diffuse maps.
3. Play around with the basic "shininess" of your material. With a Blinn, that means working the Eccentricity and Specular Roll Off sliders.
4. The exceptions to these rules come with funky surfaces like glass and shiny metals.
5. The skydome uses a Surface Shader. A Surface Shader allows you to have a material that functions independently of the lights you set up in Maya. A surface shader will always show the values and colors of your texture map regardless of how it is lit.
6. The Layered shader can be a groovy way to get more advanced material effects down the road. It lets you combine different materials into a new material.

Thursday, February 5, 2009

Quick Maya Lighting Reference


Types of lights in Maya

1. Ambient Lights = Bad (or last ditch cheat)

2. Directional Lights = Infinite in size and casts light in one direction. Often used to simulate the sun. Can cast shadows.

3. Point Lights = Omni-directional light source emanating from a single point. Can be used for light bulbs, the sun in a planetary system, a fire. Can cast shadows and be attenuated.

4. Area Lights = Similar to Directional Light but with a limited size. Can cast shadows and be attenuated. Can be used for skylights and large light fixtures. Akin to a "soft box" in movie lighting. "Relatively expensive" in terms of render time.

5. Spotlights = Most common and versatile of the lights. Your work horse. To move the aim point separately from the light, hit "T" for the "manipulator" tool.

Maya Lighting Tutorials

HDR vs LDR as seen in Far Cry

Links to some interesting Maya lighting tutorials. Pick a few, work through 'em and apply your hard-won knowledge to your own work.

Ambient Occlusion Mapping
http://4sidedpolygon.com/blog/2008/04/24/maya-ambient-ocllusion-with-mental-ray-tutorial/
http://www.game-artist.net/forums/vbarticles.php?do=article&articleid=17
http://forums.cgsociety.org/showthread.php?f=7&t=505350&highlight=displacement
(3DS MAX) http://en.9jcg.com/comm_pages/blog_content-art-34.htm

HDRI (High Dynamic Range Imaging)
Wikipedia entry on HDRI (with Far Cry example)
http://www.dbki.de/tutorials/eng/hdr_lighting/index.htm
http://en.9jcg.com/comm_pages/blog_content-art-10.htm
http://tuuhia.freehostia.com/hdri_tutorials.htm

Natural Lighting
http://www.3dtutorialzone.com/Creating-Natural-Light

Global Illumination
http://tuuhia.freehostia.com/gi_tutorial.htm
http://en.wikipedia.org/wiki/Global_illumination

Thursday, January 29, 2009

How To Set Up A Sky Dome

Here's a link to a concise tutorial on how to set up a sky dome from DezFX. Merci.
Key points:
1. Using a surface shader so you don't have to light your dome.
2. He uses a nurbs sphere, but a poly sphere is okay too. ("isoparm" in his step 3 is just the center line of the sphere for those of you NURBS newbs.)
3. You'll need a 2D sky image to use as a texture map. Hmmm. Google + "Sky Texture" FTW.
Higher res textures will give you more flexibility. Photoshop is your friend for getting the proper color and feel for your sky.
4. Here's an example of the technique in action by that bad-ass Alex Munn. Check out Alex's site. His stuff is splendid and gives such a clear example of how design, composition, modeling, textures, and lighting come together to create an environment.

How To Set Up An Image Plane Template In Maya


0. Put your image in your project's sourceimages folder.
1. In the front viewport menu, choose View > Image Plane > Import Image.
2. Choose your image. If your project is correctly set up, it should jump to the right directory.
3. You can scale the image plane by setting the Width and Height attributes in the Attribute Editor under Placement Extras.
4. To adjust the location of the image plane (up and down, side to side) change the Center attributes in the Attribute Editor under Placement Extras.
5. Create a new layer in the Layers palette, then select Window > Outliner, hit the "+" next to the front camera, select "front shape." Now right-click the new layer in the layer palette and choose "add selected objects." Now you can turn your image planes on and off.
6. To add another image plane for the side and/or top views, repeat the above steps in a different viewport menu.
7. If you've selected something else, and need to get the Image Plane attributes back, just select View > Image Plane > Image Plane Attributes > Image Plane 1 from the front viewport.

Thursday, January 22, 2009

UV Mapping Thursday

Not a catchy name, but here we are. Here is a .pdf file on UV mapping in Maya for you to cut your teeth on. It's Dio-intensive, so watch out.

Tuesday, January 20, 2009

Environment Design

Self-portrait as Tourgot, Level 56 Undead Rogue

1. We'll critique your block cities and writing and look at your source research.
2. Check out this job offer at Blizzard for a 3D environment artist and we'll discuss it.
3. We'll discuss lighting design and camera composition.
4. We'll introduce ourselves to the material editor.
5. A bit of architectural modeling

Thursday
1. UV editor and creating materials in Photoshop.
2. More on lighting including environments and skies.

Thursday, January 15, 2009

Assignment 2 - More Blox

1. Write a description of your block set to accompany your images. What is it? Where is it? Who are the inhabitants? What's the story behind it, etc.

2. In a new post, describe a new place that you will build. Describe the feeling it invokes, the colors, its history, what you see in the scene, time of day, lighting, etc.

3. In a new post, start posting images that will help you in building this place. Post at least 10 images by Tuesday.

4. Start blocking in the set using the almighty block method.

We'll look at your results on Tuesday, January 20

Tuesday, January 13, 2009

Mac Thang: Grab


To do screen caps on a Mac, use Grab.
Under Macintosh HD > Applications > Utilities > Grab
Hint: put Grab in your dock.

Maya Thang: Heads Up Display

Obnoxious Maya Tip Of The Day 3: HEADS UP!
Turn your Heads Up Display (HUD!) on and off by using Display > Heads Up Display > Poly Count. Keep an eye on those hidden points and faces.

Maya Thang: Duplicate


Maya Thang 2: DUPLICATE
The command-D shortcut is awfully handy. Just make sure that you check your Duplicate options before you start doing it! The Duplicate options are where you'll set up your mirror instance when we get into organic modeling.

Maya Thang: Keep Faces Together


Maya Thang: KEEP FACES TOGETHER
To turn this extrude option on and off, go to Polygons > Tool Options > Keep Faces Together

Assignment 1: BlockTown


Block out! Create a city made only of blocks and other primitives. You can extrude if you must, but keep the detail simple. This exercise is more about layout and composition than about modeling details.

Post some screen caps and a render of your city by Thursday, January 15. The goal of this assignment is to make something that "looks cool," as we say in the academic community.

Thursday, January 8, 2009

3D Bloggin' Homework


1. Post a render or two.
2. Track down some nice examples of clean wire meshes. Post 'em! Here's an example of a really elegant mesh by John Doublestein. Check out his excellent work at John Doublestein.com. He has a very nice technical director portfolio as well. Go to his site and click through to his flatbook.
3. Find a polygon modeling tutorial or two. Post.
4. Download the Maya PLE and practice all the stuff we worked on this week
5. Add your classmates' blogs to your blog in a sidebar gadget.

Wednesday, January 7, 2009

CG Society


Check out the forums at CGSociety. This is a good place to stay up on the latest developments in the 3D universe. The Maya forum may also come in handy for you. It has for me.

Tuesday, January 6, 2009

Welcome Evil-doers


Let's post our Blogues here, people. Get to it.