Monday, May 24, 2010

3D Animation Final Project Due Date

Oh the wonders we'll behold at the 2010 3D Animation Final!

The final critique for Art 354 3D Animation is:
Thursday, June 3 from 3:30 - 5:30 p.m.

Thursday, May 6, 2010

Rigz!

Here are some full biped rigs to play with! Click the images to download!


Who will win? Pick a fave. Pit them against each other. Have them battle Lt. Dan. Go crazy.

Also, if you're into exploring the unknown, head over to Creative Crash and check out their rig offerings!

Thursday, April 22, 2010

Gratuitous Fun - Custom Icons

The redoubtable Sian Phillips makes an excellent addition to any Maya interface!
Click here to download Miles' idiotic collection of Maya shelf icons! Includes Francisco Pulpo, Chia Pet, Sian Phillips, General Duke, Robert Conrad, Reed Richards, and more! You can use these in conjunction with Dan's cool script editor trick and/or waste hours of valuable time making your own!

Here's how to make your own Maya shelf icons.

1. Create a 32 x 32 pixel image in Photoshop
2. Save it.
3. On the mac, you'll have to convert it to .xpm format via some converter program. I use Graphic Converter. Windows users can just save .bmp files. Lucky them.
4. You can add custom commands to the shelf by Ctrl+Option+Shift selecting something from the menu - even an options box! Or, do the Script Editor trick!
5. In Maya, go to that shelf editor arrow thingy and open the Shelf Editor. Like this:
Note this is also where you can create a custom shelf, save shelves, etc.
6. In the shelf editor, select the icon you want to change, choose "Change Image," select a .xpm file and you're done! Much easier than actually doing something constructive, like animating or modeling!
Here's that frame chart too, if you're so inclined. Right click and save target as.

Tuesday, April 20, 2010

Lt. Dan Walk Cycle Basics

Here's some stuff I threw together on planning a basic two-step walk. Click on the pictures for larger images

Lt. Dan is coming for you.

Behold, your next rig. This time we've got legs and feet. . . and an optional tail. This time, we're doing walk and run cycles. Oh yes. Click here to download the rig.
Lt. Dan and the bouncing ball rig were designed and built by Matt Ornstein! Props to him, I say!

Here's a 5 minute Miles video introducing the Lt. Dan rig:


Here's the link to the youtube page, if the embed video is lame.

Let's spend today (Tuesday, April 20) putting Lt. Dan through some basic jumps. We'll start in on walks and runs on Thursday, April 22.

Thursday, April 8, 2010

Daniel Smith, people

 concept design by Daniel Smith
Thanks to Dan for laying down some Maya majesty on us! Here's the link to his site. Dig it.

Tuesday, April 6, 2010

Storyboarding & Animating the Ball Rig

Here are the demo videos demonstrating storyboarding, holds, and animating a simple jump with the ball rig. Below is the finished jump (after more timing adjustments than I covered in the videos).

Sunday, April 4, 2010

Assignment 2: Ball Rig & Blogs


Ball Story by Swanky SOU Alum Steve Hammond

Your next bit of business is to create a 10-15 second animation using the ball rig. Click here to download the rig.
This animation must demonstrate
1. Squash and stretch.
2. Hold keys.
3. Anticipation.
4. Clear staging of action and narrative.
5. Realistic weight.
6. Smooth, natural motion arcs.

Be sure to check out Steve Hammond's Ball Story (above). It's a nice example of all of these things in action using the very same ball rig. Before you start animating, you must do a storyboard breakdown of the animation which includes all of the key poses and rough timings. 

Due Dates
1. Blog and storyboard breakdown are due by Thursday, April 8. Post your storyboard breakdown on your blog. Post your blog URL along with your full name as a comment to this post.

2. Embed a playblast of your animation on your blog (via YouTube or another video service) by Tuesday, April 13.

Thursday, April 1, 2010

Video: Squash n' Stretch Ball

Here's the video on how to add squash and stretch to the bouncing ball.

Bouncing Ball Videos

Here's the link to the Maya graph editor videos!
By Tuesday, April 6 you should have a bouncing ball and a bouncing ball with squash and stretch.

Wednesday, March 31, 2010

Quick Reference for Editing Keyframes in the Maya Timeline

How to kick those keys around in the Timeline!
Turn Auto Keying on and off. Click the little key icon to the right of the timeline. Red is on, black is off.

Move a Single Key. Shift + Left Click on a key. Let go. Click and drag on the inner set of arrows to move it to its new location. When you're done, click somewhere else in the timeline to cancel out of the move/scale mode.

Move a Range of Keys. Shift + Left-click-drag a range of frames. They will turn red! Move the inner arrows to move that entire range of keys in the timeline.

Scale a Range of Keys. Shift + Left-click-drag a range of frames, as above. Yes, they will turn red! Move the outer arrows to the left to make the animation faster and move them to the right to make the animation slower. This is a very nifty way to quickly modify the timing of your animation. If you don't see the outer arrows, use the Range Slider to increase your playback range until you do! After you've adjusted your timing, if you're working on a cycle, use the handy Range Slider to adjust your playback range to fit your new timing.

Copy a Key. Right Click on a key and choose Copy from the fly-out menu.

Paste a Key. After copying a key, right click the frame into which you'd like to paste your copied keyframe. Choose Paste > Paste from the fly-out menu. Beware not to just click paste and let go. There are two pastes you have to choose. It's Maya, remember.

Change Playback Range. Enter new numbers in the inner set of boxes 'neath the timeline.

Change overall animation length. Enter new numbers in the outer set of boxes 'neath the timeline.

Delete a Key. Right-click on a key and choose Delete from the fly-out menu.

Set a Key for All Keyable Attributes.  Hit "S".

Key a Particular Attribute. Shift + W (move), Shift + E (rotate), Shift + R (scale).

Tuesday, March 30, 2010

Video: How To Set Up Your Maya Animation Preferences

 Here's a video on how to set up your Maya prefs and do some basic timeline navigation.

Art 354 3D Animation Final Critique Date

Our final critique for Art 354 3D Animation is:
Thursday, June 3 3:30 - 5:30 p.m.

Monday, March 8, 2010

Maya to ZBrush references


Olle Rydberg has a nice tutorial/overview of the Maya-ZBrush workflow here. He gives a concise breakdown of the base mesh, mapping, and rendering phases with a very useful description of the various render passes. Interestin'! BTW, SSS = SubSurface Scattering!
Below are a few pictures from a model I started recently. I made the base mesh in Maya, and then kicked it around for about 30 minutes in ZBrush.
I recommend Scott Spencer's, ZBrush Digital Sculpting Human Anatomy, which gave me the basic approach for sculpting this base mesh.

Friday, February 19, 2010

Cody McDowell, Ladies and Gentlemen

model by Cody McDowell

Thanks to Cody for the intro to Maya character modeling talk! Check his site as there's lots o' great stuff there.
goreface.blogspot.com

Friday, February 12, 2010

Creating A Character Template

1. Do some loose, fun drawings of your character to get to know him/her. Don't worry about "good drawings" here. Focus on the main proportions and lines of action.

 2. In Photoshop, draw matching front and side views. Use guides to help you align the features. I still try to stay as loose as possible at this stage, and gradually tighten up the concept. I ended up putting the side view arm on a separate layer and making it transparent so I could see the full figure. I kept a copy of the opaque arm, so I could see that part clearly in Maya as well.


3. Save out separate front and side view files to use as templates. Make sure they are the same height in pixels.


4. Load them as per the How To Set Up An Image Plane Template post. Make sure you match the front and side cameras with your front and side images.

5. Adjust the "Center" settings in the Image Plane Attributes if you want to move the image planes off of world zero. This way, the image planes won't interfere with your view of the geometry.
 

Thursday, February 11, 2010

Let There Be Light

A fantastically useful plug in that generates a lighting dome for you.
1. The plug in is in the Groups Disk > Art > minada > Art 353
2. Follow the instructions in the plug in folder.
3. Hey, your stuff looks a lot better now!

Tuesday, February 9, 2010

How To Set Up An Image Plane Template In Maya


0. Put your image in your project's sourceimages folder.
1. In the front viewport menu, choose View > Image Plane > Import Image.
2. Choose your image. If your project is correctly set up, it should jump to the right directory.
3. You can scale the image plane by setting the Width and Height attributes in the Attribute Editor under Placement Extras.
4. To adjust the location of the image plane (up and down, side to side) change the Center attributes in the Attribute Editor under Placement Extras.
5. Create a new layer in the Layers palette, then select Window > Outliner, hit the "+" next to the front camera, select "front shape." Now right-click the new layer in the layer palette and choose "add selected objects." Now you can turn your image planes on and off.
6. To add another image plane for the side and/or top views, repeat the above steps in a different viewport menu.
7. If you've selected something else, and need to get the Image Plane attributes back, just select View > Image Plane > Image Plane Attributes > Image Plane 1 from the front viewport.

Friday, February 5, 2010

Some Maya Light and Fog Tutorials

Check out these useful tutorials. You probably won't be sorry.
Remember to post any good tutorials you find on your site so you can hip your classmates to the magic.
Fog, underwater-style. Dolphin-icious.
Fog on da street.
Studio-style lighting set-up.

Tuesday, February 2, 2010

How to get some Fearful Symmetry goin'


Also, remember these handy shortcuts!
snap to grid = hold down x
snap to point = hold down v

Wednesday, January 27, 2010

More Piranesi


Because it makes me happy.

Tuesday, January 26, 2010

Delete Maya Construction History!


1. Select the object you want to free from its history.
2. Edit > Delete by Type > History
3. It's good to note that you also have a delete "Non-Deformer History" option. For some parts of the modeling process (especially rigging!) deleting your full history will cause catastrophic failure. Just keep this in the back of your mind.

Monday, January 25, 2010

Concept Designs for Left 4 Dead 2, Youtube Vids by Daarken


Randy Lundeen, Environment Design, Left 4 Dead 2
Here's a link to an interview with a character and environment designer on Left 4 Dead 2.  Dig it. CG Society's a useful site. Check it out.


Daarken, Liche King Design
Also, here's a link to Daarken's Warhammer character design demo that Cody McD shared on Wednesday. Loved it. Live it. It's just part 1 of several -so check 'em all out!

Tuesday, January 19, 2010

Project 2 - Electric Boogaloo er, I Mean, Create a SET!!!


Image from Alex Munn's El Pueblo

For your second project, you'll be researching, designing, modeling, texturing, and lighting an environment. It could be a game level, an animation set, or something you might use as part of a painting or composite photograph. Madness. Mayhem. Here's what you'll do.

Phase 1: Pre-Production Junction

1. Write a description about your place. Where is it? What year? What does it look like, smell like? What are the colors there? What emotions does the place invoke? Let your imagination run wild. Wild, I tell you.

2. Do lots and lots of visual research on your place. Architecture, flora, fauna. Mood. Look for images of interesting lighting schemes that fit your vision. And always, always. . . textures. Blog this stuff, baby. Taking your own photos is very helpful too.

3. Draw and/or collage. Lay out some concepts that will help you build your world. Blog 'em.

4. We'll take a look at all this goodness on Thursday, January 28. Git bizy.

Phase 2: Make the Magic Happen
1. Block out your set. Before you do any fancy modeling, or at least as you're doing your fancy modeling, lay out a primitive block version of your set using the techniques you learned in Project 1.

2. Model and texture specific pieces. When you finish a specific model you can swap it with its stand-in block. This way, you'll be working from the general to the specific with an eye towards your entire scene.

3. We'll cover lighting, camera, and texturing as we go. starting with UV mapping this Thursday.

4. Due date for all of this funny business is Tuesday, February 16.

Make sure you check out your hero artists to inspire you to new heights of lunacy. Blog about 'em.

Here are a few more images from Alex Munn's El Pueblo. Go to his site and bask in the brilliance.


Maya Component Editing - Extrude, and Add Edge Loop


Here are 2 new videos on Component Editing. Come on with your come-on's.

Friday, January 15, 2010

Introduction to UV Mapping - Part 2 Terminology

A point in space is defined by the set of coordinates x,y,z.  
x is left to right horizontal, y is up to down vertical, and z is foreground to background depth.
In Maya, x is red, y is green and z is blue.
Anytime we are talking about XYZ space, we are referring to 3D space.


A point in 3D or XYZ space

"UV" mapping refers to a separate, related set of coordinates where
 U is left to right horizontal and V is up to down vertical.
Whenever we talk about "UV's" and UV space we are always talking about flat, 2D space.

Look Ma, no blue! The humdrum 2D world of UV space as seen in the UV editor


NerdNote: You'll also hear UV space referred to as UVW space. Yes, there is a "W" coordinate equivalent to 3D "Z". For our introductory purposes, however, we should consider W as an unholy abomination against nature not to be spoken of in polite society.

Introduction to UV Mapping - Part 1


UV Mapping 101: Dang, Leatherface flattened out all that skin. Wrapping it around his head now requires unsightly seams!

How do you wrap a 2D image around a 3D object? It's a bit of a conundrum, and there's no perfect or easy way to do it (see Leatherface, above). It's more art than science, more ballet than ballistics, more Texas Chainsaw Massacre than . . . well, you get the picture. I've always been freaked out by the fact that there's no perfect way to translate the earth's surface to a 2D plane. Cartographers have been at it for ages. You either get distortion (Mercator's giant Greenland issue) or several discontinuous surfaces. In any event, you ALWAYS get a seam(s).

Aieee! Fair North America split in twain!!! The "orange slices" required to unwrap the globe using an "interrupted sinusoidal" projection. 

Fools! Greenland will destroy you all!!! - The polar aggrandizement of the Mercator projection.

So. . . covering 3D surfaces with 2D imagery is an imperfect business fraught with peril, but that's the fun of it. Take lots of deep breaths and romantic walks in the park, and you'll be fine.

Thursday, January 14, 2010

Undoable Camera Movement


If you keep accidentaly moving your camera in the viewport and screwing up your shot, I recommend the "undoable movement" option. Go to View > Cameras > Undoable Movement in the panel of each camera you want to make "undoable." Now, when you hit good ol' "command-z" your pans and dollys will un-do!

Thursday, January 7, 2010

Assignment 1 - Blockville and Demo Videos


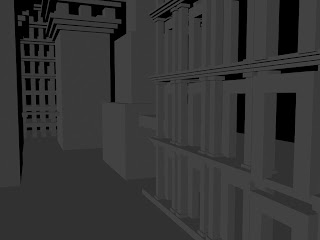
Block out! Create a city made only of blocks and other primitives.
1. Find some source material and post it to your blog! Hey, like this. Here's some Harry Potter crud, and a few concepts by "Hipper" I found at conceptart.org.


2. Focus on scale contrast and composition to help create a sense of size and distance.  To help you along, consider some Frenchy-style "repoussoir." Dig this brilliant shot from Fritz Lang's Metropolis (1927).


And you've always got to git wit' Piranesi whose Carceri (Prisons) done in 1745-50 have been a big influence on just about everybody designing big, fantastical bidnit.


Post your daily progress as you go and we'll have a final critique on Tuesday, January 19.

UPDATE VIDEOS:
1. Here is a 10 minute video to get you started with Blockville!