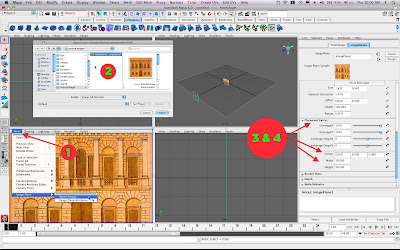
0. Put your image in your project's sourceimages folder.
1. In the front viewport menu, choose View > Image Plane > Import Image.
2. Choose your image. If your project is correctly set up, it should jump to the right directory.
3. You can scale the image plane by setting the Width and Height attributes in the Attribute Editor under Placement Extras.
4. To adjust the location of the image plane (up and down, side to side) change the Center attributes in the Attribute Editor under Placement Extras.
5. Create a new layer in the Layers palette, then select Window > Outliner, hit the "+" next to the front camera, select "front shape." Now right-click the new layer in the layer palette and choose "add selected objects." Now you can turn your image planes on and off.
6. To add another image plane for the side and/or top views, repeat the above steps in a different viewport menu.
7. If you've selected something else, and need to get the Image Plane attributes back, just select View > Image Plane > Image Plane Attributes > Image Plane 1 from the front viewport.
No comments:
Post a Comment