Using Lt. Dan, create a short shot. DO NOT USE MORE THAN 150 FRAMES.
1) Write a description of the shot. Remember to include relevant info on character, motivation, circumstances, back-story, etc.
2) Break the shot down on paper. Give us the main keys and your rough timings.
3) Go get 'em. Due on Thursday, May 22 at the beginning o' class.
Thursday, May 15, 2008
Wednesday, May 14, 2008
Read this, folks

Good article on ILM VizFX Supervisor, Ben Snow. Check it out. It's always good to get a sense of how people made it into their cool jobs. Might as well be you. . . Also, good for seeing how many jobs in the biz involve a range of skills and a brain hungry to solve problems.
Friday, May 2, 2008
Lt. Dan Walk Cycle II - Character Set
A character set sets keys for all objects and attributes assigned to the character set whenever you set a key for any one of those objects or attributes. Sometimes that's great, other times it's not so great. Character sets can be turned on and off accordingly. A character set will allow me to not have to worry about manually setting position and rotation keys for the plant foot. That is good.
Here's how to make a Character Set.
1. Select the objects you want to be in the character set. I'm going to choose the outer "Ring of Saturn" (ball_CTRL) and the two foot control boxes. Use the shift key to select multiple objects.
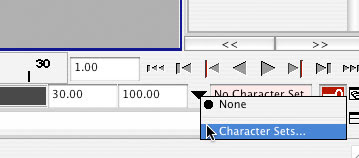
2. Click and hold the black arrow next to the pink box that says "No Character Set" at the bottom right of the screen. Choose "Character Sets. . ." from the pop-up.
3. The "Relationship Editor" opens. From the Relationship Editor menu choose Edit > Create Character Set > Lil' Options Box.

4. From the options dialog, choose the attributes you want to be keyed by the set. I choose All Keyable Except: Scale and Visibility.
5. Your new Character Set appears in the left hand part of the Relationship Editor.
6. You can add and delete attributes for the character set using the Edit menu in the Relationship Editor. MAKE SURE THAT YOU HAVE THE CHARACTER SET SELECTED IF YOU WISH TO EDIT IT! It's easy to miss that. If you do miss it, you will be driven crazy.
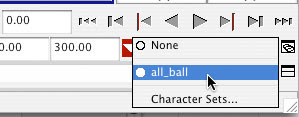
7. Now select the new character set from the black arrow at the bottom right of the screen (where you first opened the relationship editor). The name of your character set should now be showing in the little pink box next to the arrow. Whenever you want to turn it off, select "None" from the black arrow flyout menu.
8. Save this file under a new name so you don't have to go through these same steps every time you work on this character. Then save another version with a name like "LDanWalk01."
Here's how to make a Character Set.
1. Select the objects you want to be in the character set. I'm going to choose the outer "Ring of Saturn" (ball_CTRL) and the two foot control boxes. Use the shift key to select multiple objects.
2. Click and hold the black arrow next to the pink box that says "No Character Set" at the bottom right of the screen. Choose "Character Sets. . ." from the pop-up.

3. The "Relationship Editor" opens. From the Relationship Editor menu choose Edit > Create Character Set > Lil' Options Box.

4. From the options dialog, choose the attributes you want to be keyed by the set. I choose All Keyable Except: Scale and Visibility.
5. Your new Character Set appears in the left hand part of the Relationship Editor.
6. You can add and delete attributes for the character set using the Edit menu in the Relationship Editor. MAKE SURE THAT YOU HAVE THE CHARACTER SET SELECTED IF YOU WISH TO EDIT IT! It's easy to miss that. If you do miss it, you will be driven crazy.
7. Now select the new character set from the black arrow at the bottom right of the screen (where you first opened the relationship editor). The name of your character set should now be showing in the little pink box next to the arrow. Whenever you want to turn it off, select "None" from the black arrow flyout menu.

8. Save this file under a new name so you don't have to go through these same steps every time you work on this character. Then save another version with a name like "LDanWalk01."
Thursday, May 1, 2008
Lt. Dan Walk Cycle I - Set-up
Here's a way to create a walk cycle with Lt. Dan.
1. Set frames per second to 30 FPS.
Maya > Preferences > Settings > Working Units > Time
2. Set auto key for character sets.
Maya > Preferences > Settings > Animation > Auto Key > On Character Sets > Key All Attributes
3. Set default In Tangents to Linear.
Maya > Preferences > Settings > Animation > Tangents > Default In Tangent
4. Set default Out Tangents to Linear or Stepped.
Maya > Preferences > Settings > Animation > Tangents > Default In Tangent
Stepped tangents hold each key pose with no interpolation. Linear tangents give linear interpolation. Some folk like the stepped approach because it lets you focus on the poses without worrying about interpolation. In most cases, I go with the linear approach because it lets me work in a more straight-ahead style without having to worry about going back to "un-step" the tangents later. Experiment with both.
Subscribe to:
Posts (Atom)