Friday, February 19, 2010

Cody McDowell, Ladies and Gentlemen

model by Cody McDowell

Thanks to Cody for the intro to Maya character modeling talk! Check his site as there's lots o' great stuff there.
goreface.blogspot.com

Friday, February 12, 2010

Creating A Character Template

1. Do some loose, fun drawings of your character to get to know him/her. Don't worry about "good drawings" here. Focus on the main proportions and lines of action.

 2. In Photoshop, draw matching front and side views. Use guides to help you align the features. I still try to stay as loose as possible at this stage, and gradually tighten up the concept. I ended up putting the side view arm on a separate layer and making it transparent so I could see the full figure. I kept a copy of the opaque arm, so I could see that part clearly in Maya as well.


3. Save out separate front and side view files to use as templates. Make sure they are the same height in pixels.


4. Load them as per the How To Set Up An Image Plane Template post. Make sure you match the front and side cameras with your front and side images.

5. Adjust the "Center" settings in the Image Plane Attributes if you want to move the image planes off of world zero. This way, the image planes won't interfere with your view of the geometry.
 

Thursday, February 11, 2010

Let There Be Light

A fantastically useful plug in that generates a lighting dome for you.
1. The plug in is in the Groups Disk > Art > minada > Art 353
2. Follow the instructions in the plug in folder.
3. Hey, your stuff looks a lot better now!

Tuesday, February 9, 2010

How To Set Up An Image Plane Template In Maya


0. Put your image in your project's sourceimages folder.
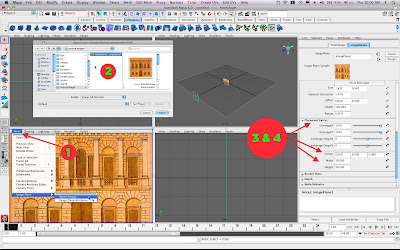
1. In the front viewport menu, choose View > Image Plane > Import Image.
2. Choose your image. If your project is correctly set up, it should jump to the right directory.
3. You can scale the image plane by setting the Width and Height attributes in the Attribute Editor under Placement Extras.
4. To adjust the location of the image plane (up and down, side to side) change the Center attributes in the Attribute Editor under Placement Extras.
5. Create a new layer in the Layers palette, then select Window > Outliner, hit the "+" next to the front camera, select "front shape." Now right-click the new layer in the layer palette and choose "add selected objects." Now you can turn your image planes on and off.
6. To add another image plane for the side and/or top views, repeat the above steps in a different viewport menu.
7. If you've selected something else, and need to get the Image Plane attributes back, just select View > Image Plane > Image Plane Attributes > Image Plane 1 from the front viewport.

Friday, February 5, 2010

Some Maya Light and Fog Tutorials

Check out these useful tutorials. You probably won't be sorry.
Remember to post any good tutorials you find on your site so you can hip your classmates to the magic.
Fog, underwater-style. Dolphin-icious.
Fog on da street.
Studio-style lighting set-up.

Tuesday, February 2, 2010

How to get some Fearful Symmetry goin'


Also, remember these handy shortcuts!
snap to grid = hold down x
snap to point = hold down v