A 2 minute video on how to adjust your camera's clipping plane.
Whoo-hoo.
Thursday, January 28, 2010
Wednesday, January 27, 2010

Tuesday, January 26, 2010
Delete Maya Construction History!

2. Edit > Delete by Type > History
3. It's good to note that you also have a delete "Non-Deformer History" option. For some parts of the modeling process (especially rigging!) deleting your full history will cause catastrophic failure. Just keep this in the back of your mind.
Monday, January 25, 2010
Concept Designs for Left 4 Dead 2, Youtube Vids by Daarken

Randy Lundeen, Environment Design, Left 4 Dead 2
Here's a link to an interview with a character and environment designer on Left 4 Dead 2. Dig it. CG Society's a useful site. Check it out.
Daarken, Liche King Design
Also, here's a link to Daarken's Warhammer character design demo that Cody McD shared on Wednesday. Loved it. Live it. It's just part 1 of several -so check 'em all out!
Tuesday, January 19, 2010
Project 2 - Electric Boogaloo er, I Mean, Create a SET!!!

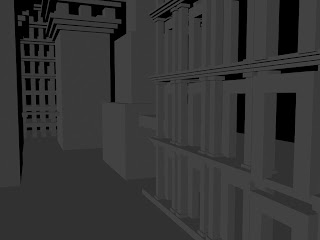
Image from Alex Munn's El Pueblo
For your second project, you'll be researching, designing, modeling, texturing, and lighting an environment. It could be a game level, an animation set, or something you might use as part of a painting or composite photograph. Madness. Mayhem. Here's what you'll do.
Phase 1: Pre-Production Junction
1. Write a description about your place. Where is it? What year? What does it look like, smell like? What are the colors there? What emotions does the place invoke? Let your imagination run wild. Wild, I tell you.
2. Do lots and lots of visual research on your place. Architecture, flora, fauna. Mood. Look for images of interesting lighting schemes that fit your vision. And always, always. . . textures. Blog this stuff, baby. Taking your own photos is very helpful too.
3. Draw and/or collage. Lay out some concepts that will help you build your world. Blog 'em.
4. We'll take a look at all this goodness on Thursday, January 28. Git bizy.
Phase 2: Make the Magic Happen
1. Block out your set. Before you do any fancy modeling, or at least as you're doing your fancy modeling, lay out a primitive block version of your set using the techniques you learned in Project 1.
2. Model and texture specific pieces. When you finish a specific model you can swap it with its stand-in block. This way, you'll be working from the general to the specific with an eye towards your entire scene.
3. We'll cover lighting, camera, and texturing as we go. starting with UV mapping this Thursday.
4. Due date for all of this funny business is Tuesday, February 16.
Make sure you check out your hero artists to inspire you to new heights of lunacy. Blog about 'em.
Here are a few more images from Alex Munn's El Pueblo. Go to his site and bask in the brilliance.


Friday, January 15, 2010
Introduction to UV Mapping - Part 2 Terminology
A point in space is defined by the set of coordinates x,y,z.
x is left to right horizontal, y is up to down vertical, and z is foreground to background depth.
In Maya, x is red, y is green and z is blue.
Anytime we are talking about XYZ space, we are referring to 3D space.

"UV" mapping refers to a separate, related set of coordinates where
U is left to right horizontal and V is up to down vertical.
Whenever we talk about "UV's" and UV space we are always talking about flat, 2D space.

NerdNote: You'll also hear UV space referred to as UVW space. Yes, there is a "W" coordinate equivalent to 3D "Z". For our introductory purposes, however, we should consider W as an unholy abomination against nature not to be spoken of in polite society.
x is left to right horizontal, y is up to down vertical, and z is foreground to background depth.
In Maya, x is red, y is green and z is blue.
Anytime we are talking about XYZ space, we are referring to 3D space.

A point in 3D or XYZ space
"UV" mapping refers to a separate, related set of coordinates where
U is left to right horizontal and V is up to down vertical.
Whenever we talk about "UV's" and UV space we are always talking about flat, 2D space.

Look Ma, no blue! The humdrum 2D world of UV space as seen in the UV editor
NerdNote: You'll also hear UV space referred to as UVW space. Yes, there is a "W" coordinate equivalent to 3D "Z". For our introductory purposes, however, we should consider W as an unholy abomination against nature not to be spoken of in polite society.
Introduction to UV Mapping - Part 1

UV Mapping 101: Dang, Leatherface flattened out all that skin. Wrapping it around his head now requires unsightly seams!
How do you wrap a 2D image around a 3D object? It's a bit of a conundrum, and there's no perfect or easy way to do it (see Leatherface, above). It's more art than science, more ballet than ballistics, more Texas Chainsaw Massacre than . . . well, you get the picture. I've always been freaked out by the fact that there's no perfect way to translate the earth's surface to a 2D plane. Cartographers have been at it for ages. You either get distortion (Mercator's giant Greenland issue) or several discontinuous surfaces. In any event, you ALWAYS get a seam(s).

Aieee! Fair North America split in twain!!! The "orange slices" required to unwrap the globe using an "interrupted sinusoidal" projection.

Fools! Greenland will destroy you all!!! - The polar aggrandizement of the Mercator projection.
So. . . covering 3D surfaces with 2D imagery is an imperfect business fraught with peril, but that's the fun of it. Take lots of deep breaths and romantic walks in the park, and you'll be fine.
Thursday, January 14, 2010
Undoable Camera Movement

If you keep accidentaly moving your camera in the viewport and screwing up your shot, I recommend the "undoable movement" option. Go to View > Cameras > Undoable Movement in the panel of each camera you want to make "undoable." Now, when you hit good ol' "command-z" your pans and dollys will un-do!
Thursday, January 7, 2010
Assignment 1 - Blockville and Demo Videos
 Block out! Create a city made only of blocks and other primitives.
1. Find some source material and post it to your blog! Hey, like this. Here's some Harry Potter crud, and a few concepts by "Hipper" I found at conceptart.org.


2. Focus on scale contrast and composition to help create a sense of size and distance. To help you along, consider some Frenchy-style "repoussoir." Dig this brilliant shot from Fritz Lang's Metropolis (1927).


Post your daily progress as you go and we'll have a final critique on Tuesday, January 19.
UPDATE VIDEOS:
1. Here is a 10 minute video to get you started with Blockville!
Maya Interface Handouts
We're all looking for a handout. Click the images to see them in their printable high-res glory.


Tuesday, January 5, 2010
Winter Warriors

Each week you will be posting to your blog.
1. Images from an interesting site or artist that you're looking at.
2. Some of your own work. Photos, writing, doodles, sketches, anything.
3. Post samples of whatever you've been working on in this class.
Subscribe to:
Posts (Atom)