Using Lt. Dan, create a short shot. DO NOT USE MORE THAN 150 FRAMES.
1) Write a description of the shot. Remember to include relevant info on character, motivation, circumstances, back-story, etc.
2) Break the shot down on paper. Give us the main keys and your rough timings.
3) Go get 'em. Due on Thursday, May 22 at the beginning o' class.
Thursday, May 15, 2008
Wednesday, May 14, 2008
Read this, folks

Good article on ILM VizFX Supervisor, Ben Snow. Check it out. It's always good to get a sense of how people made it into their cool jobs. Might as well be you. . . Also, good for seeing how many jobs in the biz involve a range of skills and a brain hungry to solve problems.
Friday, May 2, 2008
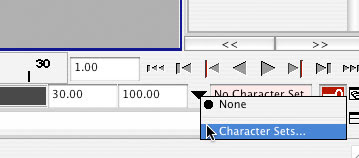
Lt. Dan Walk Cycle II - Character Set
A character set sets keys for all objects and attributes assigned to the character set whenever you set a key for any one of those objects or attributes. Sometimes that's great, other times it's not so great. Character sets can be turned on and off accordingly. A character set will allow me to not have to worry about manually setting position and rotation keys for the plant foot. That is good.
Here's how to make a Character Set.
1. Select the objects you want to be in the character set. I'm going to choose the outer "Ring of Saturn" (ball_CTRL) and the two foot control boxes. Use the shift key to select multiple objects.
2. Click and hold the black arrow next to the pink box that says "No Character Set" at the bottom right of the screen. Choose "Character Sets. . ." from the pop-up.
3. The "Relationship Editor" opens. From the Relationship Editor menu choose Edit > Create Character Set > Lil' Options Box.

4. From the options dialog, choose the attributes you want to be keyed by the set. I choose All Keyable Except: Scale and Visibility.
5. Your new Character Set appears in the left hand part of the Relationship Editor.
6. You can add and delete attributes for the character set using the Edit menu in the Relationship Editor. MAKE SURE THAT YOU HAVE THE CHARACTER SET SELECTED IF YOU WISH TO EDIT IT! It's easy to miss that. If you do miss it, you will be driven crazy.
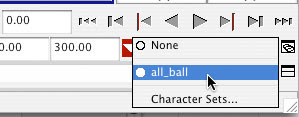
7. Now select the new character set from the black arrow at the bottom right of the screen (where you first opened the relationship editor). The name of your character set should now be showing in the little pink box next to the arrow. Whenever you want to turn it off, select "None" from the black arrow flyout menu.
8. Save this file under a new name so you don't have to go through these same steps every time you work on this character. Then save another version with a name like "LDanWalk01."
Here's how to make a Character Set.
1. Select the objects you want to be in the character set. I'm going to choose the outer "Ring of Saturn" (ball_CTRL) and the two foot control boxes. Use the shift key to select multiple objects.
2. Click and hold the black arrow next to the pink box that says "No Character Set" at the bottom right of the screen. Choose "Character Sets. . ." from the pop-up.

3. The "Relationship Editor" opens. From the Relationship Editor menu choose Edit > Create Character Set > Lil' Options Box.

4. From the options dialog, choose the attributes you want to be keyed by the set. I choose All Keyable Except: Scale and Visibility.
5. Your new Character Set appears in the left hand part of the Relationship Editor.
6. You can add and delete attributes for the character set using the Edit menu in the Relationship Editor. MAKE SURE THAT YOU HAVE THE CHARACTER SET SELECTED IF YOU WISH TO EDIT IT! It's easy to miss that. If you do miss it, you will be driven crazy.
7. Now select the new character set from the black arrow at the bottom right of the screen (where you first opened the relationship editor). The name of your character set should now be showing in the little pink box next to the arrow. Whenever you want to turn it off, select "None" from the black arrow flyout menu.

8. Save this file under a new name so you don't have to go through these same steps every time you work on this character. Then save another version with a name like "LDanWalk01."
Thursday, May 1, 2008
Lt. Dan Walk Cycle I - Set-up
Here's a way to create a walk cycle with Lt. Dan.
1. Set frames per second to 30 FPS.
Maya > Preferences > Settings > Working Units > Time
2. Set auto key for character sets.
Maya > Preferences > Settings > Animation > Auto Key > On Character Sets > Key All Attributes
3. Set default In Tangents to Linear.
Maya > Preferences > Settings > Animation > Tangents > Default In Tangent
4. Set default Out Tangents to Linear or Stepped.
Maya > Preferences > Settings > Animation > Tangents > Default In Tangent
Stepped tangents hold each key pose with no interpolation. Linear tangents give linear interpolation. Some folk like the stepped approach because it lets you focus on the poses without worrying about interpolation. In most cases, I go with the linear approach because it lets me work in a more straight-ahead style without having to worry about going back to "un-step" the tangents later. Experiment with both.
Tuesday, April 29, 2008
Tuesday, April 29 Everybody's Happy Nowadays
Alreet, we'll take a look at the ball-rig animations and get acquainted with a very cool rig--Lt. Dan. We'll use Lt. Dan to do a walk and a run. If your walk and run are looking good, feel free to use him to do something else. You could combine him with the ball rig or somethin'. Anyhow, we'll look at it all next Tuesday.
Speaking of next Tuesday, high priest Casey Pyke will introduce us to animating a full-body biped rig. Heck, he'll even show us some of the cool quadraped animating he's doing with Trisha Johansen's cyborg-dog rig. Ah, the majesty.
Speaking of next Tuesday, high priest Casey Pyke will introduce us to animating a full-body biped rig. Heck, he'll even show us some of the cool quadraped animating he's doing with Trisha Johansen's cyborg-dog rig. Ah, the majesty.
Thursday, April 24, 2008
Thursday, April 24--good stuff going on


There's a lecture by very cool visiting artist Roger Shimomura at 4:00 in the Meese Auditorium. Hit it. A show including his work opens at the Schneider Museum tonight.
Be sure to check out Jen Harlow's blog as she's going through the same animation convulsions as you are, though she's in her second year of Maya madness. She has a good bit on different approaches to blocking in 3D animation.
There's a free night of cool silent films over in the Meese Auditorium this weekend. Great stuff for animators--Check 'em out!
Tuesday, April 22, 2008
Weight. We all like weight. . . and breakdown sheets

1. "How can you tell if someone knows how to animate?"
"WEIGHT."
2. Realistic weight = good.
3. Floaty polygons = bad.
4. Holds = good too.
You can click on the image at left to get a high res gif of our crude breakdown sheet. Print 'em and weep.
Thursday, April 17, 2008
Keep your meat ice-cold

There we went. I'm going to be adding the Special Projects (Art 450) sites to the student work as well. Yeeargh.
Wednesday, April 16, 2008
Thursday, April 17--Blogs, Ball Rig
Blog time.
1. Get your blogs set up.
2. Get your Google docs account set up.
3. How to render out a .mov file.
4. How to upload and link to your blog.
5. Post your urls as comments to this post.
Intro to the ball rig.
Moving holds
Big Changes
Ease in and out (easing, Eazy-E)
Weight
Aniticipation
Timing
Spacing
ONE THING AT A TIME
The assignment:
Create 2 animations with the following themes:
1. A ball and a wall
2. A ball and a ball
Post .movs and your breakdowns to your blog.
Due Thursday, April 24
200 frames MAXIMUM for each!!!!!! 100 frames is fine.
Monday, April 14, 2008
Call for Blogs, Sites, etc.

As you may have noticed, I've added a classmates link page to this here blog. If you have a site/blog/whatever with your work on it--send it to me, and I'll post it. Better yet, post your link here as a comment!
Sunday, April 13, 2008
Tuesday, April 15 Class Part 2: Jumping Ball and Intro to Hold Keys
It's time to take our first stab at character animation--we're going to make the ball live. We'll start off by making the ball perform a basic jump.
As we'll see from our breakdown, this animation calls for three holds. Holds are important in creating believable, life-like character animation. Holds let the audience absorb one thing and get ready for the next. A hold acts as a visual comma or period, separating and ordering actions. Knowing where and when to add holds will help your animation become more deliberate and coherent. In Maya, we'll refer to a hold key as a keyframe that contains the same scale, position, and/or rotation info as the previous key. For today, we'll want to connect our holds with linear tangents. Let's get started on the ball.
1. Draw your breakdown. Here's my breakdown showing the main keys and rough timings:
1 Rest pose HOLD to 10
10 Hold Key
13 Squash. HOLD to 24
24 Hold Key
25 Stretch
30 Apex
35 Stretch to contact
36 Contact squash
37 Rest pose HOLD to 50 (copy from frame 1--copying frames can mess with tangents!)
50 Hold Key
2. Look at the breakdown and determine what kind of keys you're going to have to set in Maya. For this particular animation, we'll need move and scale keys, but we're not going to be using rotation at all.
3. Figure out which keys will need move, which will need scale, and which will need both. For this animation we'll set scale and position keys for each frame as we block in the animation. In the 3-bounce animation we saw that without proper hold keys, a scale change on frame 10 would carry throughout the entire animation. Not good. It was fixable, but it threw off our work flow and raised the stress levels. With more complicated rigs, not setting hold keys can throw off your animation to the point of ruin.
4. With breakdown in hand, enter Maya's lair. Set up a floor, ball, and camera.
5. Block in your animation, setting position (Shift + W) and scale (Shift + R) keys for each pose. We're not doing anything technically new for this assignment, so review the 3 Bounce tutorial from last week if you forget any of the procedures. Remember to save your work and scrub the timeline early and often.
Tuesday, April 15 Class Part 1: Overview
Here's what we'll cover at the beginning of class:
1) How to manually adjust animation spacing by adding keys.
2) How to animate a basic ball jump and an introduction to holds and anticipation.
I'll be meeting with the 450 students again during the 2nd half of class, so we'll critique the 3 bounce and ball jump animations on Thursday. We'll also get you rocking your first rig, and talk easing and moving holds.
Thursday, April 10, 2008
The 3 Bounce Ball Part 6: Stretch and Rotation
1. Add a key position key frame on the frame after the squash frame.
2. On the key you just added, reset the x, y, and z scale to 1 in the channel box. Now use scale to stretch the ball on this frame. Remember to keep the mass of the ball constant.
3. Rotate the stretched ball so that it follows the motion arc.
4. Add a rotation key at the apex continuing the rotation you established in the stretch frame.
5. Add a rotation key on frame 1.
Whew, have a cigarette.
The 3 Bounce Ball Part 5: Squash
1. First add a scale key (Shift + R) to the first hit key. This will prevent the ball from squashing before it hits the first contact.
2. In the timeline, copy the first hit key and paste it into the next frame. Here's how! In the timeline, Right-click the first key, choose Copy. Right-click the next frame, and choose Paste > Paste.
3. Using scale (R key), squash the ball on the squash frame. BE SURE TO CHECK THE SQUASH IN SEVERAL WINDOWS otherwise, you're going to screw up the ball's volume. Bad. Scrub the hit and squash several times to make sure your ball isn't shrinking or expanding on the squash. Scrub it in several windows. Helpful hint: Holding down control and moving the scale manipulator on one axis will freeze scale on that axis and scale along the other 2 axes.
4. Now you need to tell the ball where to return to it's original scale. I'll be boring, and choose the apex fame after the first contact. I move to that key in the timeline, open up the channel box, and set each of the x,y, and z scale inputs to 1. Make sure, you're in the SCALE boxes, and not the rotation or transform boxes. Easy to mix those up. Playback your animation and save it using .0X suffix.
The 3 Bounce Ball Part 4: Spacing and Motion Arcs
Time to adjust the SPACING and motion arcs. We'll do this in the Graph Editor.
1. Window > Animation > Graph Editor.
2. Make sure the ball is selected and that the move tool (W) is active. If the ball's not selected, the graph editor will be blank. If the move tool isn't active, nothing will work right in the Graph Editor. Hit those lovely yellow and blue zoom buttons so you can actually see what you're working on.
3. Notice how the curve is spikey and sharp. That's what linear tangents do for you. Let's bend 'em. Select the curve. This selects all of the points and tangents on the curve. Right click the curve and select Tangents > Spline.
4. Maya makes you go through some colorful steps in order to edit your curve the way you want to.
Break the tangents
Weight the tangents
Free the tangent weights (and your mind will follow).Let's add squash and stretch. To do this, we'll be adding scale keys.
Wednesday, April 9, 2008
The 3 Bounce Ball Part 3: Adjust the Timing
Once you've got your keys in the right physical position, it's time to adjust their position in time. This is arguably the most important step in the animation process. If the timing is right, it will make up for a lot of cruddy spacing, and posing; if the timing is wrong, ain't no amount of fancy fiddling gonna make it look right.
1. Play back the animation and check if the bounces feel too slow or too fast. They don't bounce naturally, but don't worry about that. Focus on the hits and the apexes. Are they on the proper beat--are they happening at the right pace? Think like a dancer or a conductor. It needs to feel right.
2. If the bounces and hits are happening too slowly, move the keys closer together. If they're too fast, move them farther apart. To move keys in the timeline, shift + click on a key, then grab the inner arrows to move the key.
3. Congratulations, you've just roughed in the timing. Save your work with the 0X suffix, text the mistress, and hit the town.
Further caveat. If you don't get the timing right now, this animation is doomed to failure. Get it right early, because it's increasingly difficult to make major timing adjustments with each bit of complexity you add to your animation. Get your timing down before you open up the graph editor.
The 3 Bounce Ball Part 2: Block-in
1. Now it's time to block in your main keys. Move the ball where you want to begin the animation and set a position key (shift + W) on frame 1. I turn on auto keying at this point, but that's my personal preference. If you don't turn it on, make sure you're setting keys manually where necessary.
2. Look at your breakdown sheet to figure out where to set your next key. Move the timeslider to that frame. Move the ball. Set a position key. (Shift + W). Repeat until you've blocked in all of your hits and apexes. Don't set squash and stretch keys yet. Save your work with the 0X suffix.
3. After setting your rough position keys, check that your keys are positioned in correct relation to each other. Your apex keys should be in the middle of your hit keys. If they're not, the ball will not bounce evenly and realistically. To check the position you can use ghosting.
4. To ghost the ball, first make sure you've set Maya to use the Animation menu-set. If you don't, "Animation" will not appear in the menu bar. Now, with the ball selected, choose Animation > Ghost Selected > Options Box from the menu bar. If you select custom frames in the Ghost options, you can set a higher number of ghosts. I chose 20 so I can get a good view of how the keys and apexes relate to each other.
5. Use the ghosts to examine the ball motion checking that the hits and apexes are where you want them to be. If they're uneven and screwed up, fix them by moving to a keyframe and repositioning the ball. Scrub the timeline back and forth to update the ghosts. You should have sharp, angled Pong-like bounces with perfectly even spacing. That's the linear tangent in action. Robotsville, Daddy-o.
The 3 Bounce Ball Part 1: Set up Your Scene and Camera
Summary of the steps for making our 3 bounce animation.
0. Make your ball and floor. Set your default tangent preferences to linear.
1. Create a camera (Create > Cameras > Camera ).
2. From your perspective viewport menu, choose Panels > Perspective > Camera1. This changes the perspective view so that it shows you what the camera sees. If you want to switch back to your working perspective view, go to this same spot and choose "perspective" instead of Camera1.
3. Adjust the camera so that it frames your scene. Move, scale, and rotate it as necessary. Scale doesn't affect the camera lens or position, but it does make it easier to see the camera object in the viewports. You can also adjust the camera in the camera viewport, the channel box, and the attribute editor.
Monday, April 7, 2008
Tuesday Maya Magic
Here's the agenda for Tuesday's class.
1. How to set up and adjust a camera.
2. How to render a preview (playblast).
3. More fun with the graph editor.
4. How to "ghost" or onionskin an animation.
5. Introduce the Dopesheet.
1. How to set up and adjust a camera.
2. How to render a preview (playblast).
3. More fun with the graph editor.
4. How to "ghost" or onionskin an animation.
5. Introduce the Dopesheet.
Okay, okay, we didn't get to the dopesheet or playblastin'. We'll do that on Thursday as well as look at the syllabus (better late than never).
Have your 3 bounce animations ready to show to the class on Thursday. Our next assignment will be the sentient jumping ball.
Friday, April 4, 2008
Busting Moves and/or Rhymez in the Maya Timeline
1. Turn Auto Keying on and off. Click the little key icon to the right of the timeline. Red is on, black is off.
3. Copy a Key. Right Click on a key and choose Copy from the fly-out menu.
4. Paste a Key. After copying a key, right click the frame into which you'd like to paste your copied keyframe. Choose Paste > Paste from the fly-out menu. Beware not to just click paste and let go. There are two pastes you have to choose. It's Maya, remember.
5. Change Playback Range. Enter new numbers in the inner set of boxes 'neath the timeline.
6. Change overall animation length. Enter new numbers in the outer set of boxes 'neath the timeline.
Getting set up to animate in Maya
Maya's got a funny way of showing that it loves you. Here are the steps you need to take to get it to behave correctly. You should only have to do this once. (Until you have to trash your pref's. Then you'll be doing it again.)
2. Open a new file.
3. Set playback to Real Time (30 fps). Under Maya > Preferences > Settings > Timeline > Playback. Also, go ahead and set Looping to continuous.
4. Set Default in and out tangents to Linear. This is under Maya > Preferences > Settings > Animation. Go ahead and check the Weighted Tangents box here as well. Ha ha, notice there are two categories of "Animation" in the preferences panel. Make sure you're on the right one. Brilliant.
Subscribe to:
Posts (Atom)